It won't be long now before most of us will be dragging out the Christmas tree. You'll dig through all those boxes in your attic to find the one containing the assortment of ornaments you've collected over the years and reminisce as you hang each one on the tree. Why not add a unique handcrafted keepsake ornament to the mix? The two ornaments from my collection were very popular with buyers last year. In fact, I was working 14-16 hour days just to keep up with demand! Then, just 12 days before Christmas, they were featured on the front page of Etsy's Holiday section and so many orders pored in that I ran out of copper! I'm not complaining mind you. But I am hoping to get a little more sleep this year. I've gotten a head start this season by creating a bundle of the basic shapes.
Here's a behind-the-scenes creative process for the tree shaped ornament. I begin by stamping the design on a sheet of 22 gauge copper using a rubber stamp. Then it hangs out in the etchant for an hour or so getting a little jiggle from time to time to release the etched particles.

The next step is sawing the detailed tree shape around the etched design. It's a rather intricate process but I've been practicing and have gotten to be pretty fast. :)
After dipping it in liver of sulfur which gives it a dark patina, I toss it in the rotary tumbler to smooth those rough edges and give it strength. Finally, I brush on the protective coating and in 48 hours, it's dry and ready to add the personalized banner and star.
Once again, using my trusty jeweler's saw, I saw out the banner and star shapes from a sheet of brass. After carefully measuring the spacing, I grab the hammer and...bang, bang, bang...I stamp the name and year using metal stamps. After repeating the same steps as the tree...liver of sulfur, tumble polishing and protective coating, I then connect them to the tree with tiny rivets. The final step is to add the brass wire for the hanger.

As you can see, lots of detail go into making these special ornaments as I want them to be treasured for many years to come. Choose the Christmas Tree design featured here or Baby's First Christmas. Both can be found in the Christmas Ornament Collection.
Hope you have a stress free holiday season!
So, I've had my website and blog up and running for a few months now and decided it's time to share with you how I got started making jewelry.
I have always had a love for creating things. For years, I dreamed of being able to make a living using my creative talents. My first love was photography...specifically, landscapes and nature. I love traveling and being outdoors and took up photography to capture the beauty God created. As you may know, the best light for outdoor photography is sunrise and sunset. I spent many vacations waking up early in the morning and trekking to my scouted destination in the dark in order to be there at sunrise. The image below was taken on a beautiful chilly morning in the Grand Tetons. When I arrived at the location I had chosen the day before, I saw that someone had set up a small tent and spent the night in order to be there at first light. First light came and went and finally a guy crawls from the tent only to realize he had slept through the morning light. He was not a happy camper...literally. The Rocky Mountains are a magical place for me. (Sorry for the image quality...I snapped this from a framed print under glass. This was long before the digital age so I have only have negatives and the print I made).

As much as I love travel photography, I wanted to find something that I could do at home. As a child, I had taken art lessons in pastels and oil but had always loved the fluidity of watercolor. I signed up for a watercolor class and fell in love with the medium. And I had oodles of subject matter to choose from...my portfolio of outdoor photos! One of my favorite watercolors is this colorful sunflower painting.

Then one day I was browsing the internet looking for a specific style necklace and found one I liked from a wonderful shop on Etsy. That necklace inspired me to try designing a piece of jewelry for myself. I headed out to Michaels to buy beads, wire and a few other supplies, sat down to "create" and...nothing. I would string a few beads together, decide I didn't like the design...try it again with different beads...still didn't like the design. Stringing beads into a pleasing design was harder than I expected. So after a few days of "beading" without being happy with the outcome, I put jewelry making aside.
But I've never been a quitter and I couldn't quit thinking about it. I continued to be inspired by other artists' work. Metalwork began to appeal to me so I decided to read and watch videos to learn more about becoming a metalsmith. I went to a local bead show and purchased a jeweler's saw, a dapping punch set, metal stamps and copper. After spending time with my new tools, my true love affair with jewelry design began.
At the time, I was working full-time in the marketing field but was thinking ahead to the day I could devote more time to my creative aspirations. Although I had sold a few photographs and watercolor paintings, I realized that designing jewelry was more in line with my desire to make a living doing something I love. So after a couple of years creating pieces for myself, family and friends, I decided to venture into the world of Etsy and share my designs with others. It has now been nearly five years since I opened my shop and I am thrilled to have so many wonderful customers who have made my business a success!.
In late 2013, I began designing and selling jewelry full time. I am very fortunate to be able to do something I love and so thankful God blessed me with the talent and skills to make it all possible. The takeaway from this is...dreams do come true. Just keep chasing that dream...one day it will happen.
Blessings,

I am loving tribal designs so much right now. I've been cutting out feathers and arrows with my trusty jeweler's saw and love how they are turning out. These three different feather designs include etched copper, sterling silver and hammered copper, all with a soldered sterling silver shaft and quill.

Using a variation on the mixed metal arrow bracelet in my shop, I'm now offering a sterling silver arrow necklace with or without the words "BE BRAVE." It's a fun piece...I made myself one and wear it every day!

I've also collected quite a few metal design stamps with native american and southwest designs. I love making unique one-of-a-kind pendants with tribal markings. I have even tried my hand at making my own design stamps which is so cool because they will be truly unique and not mass produced.

You can check out my tribal designs in the "Free Spirit" collection in my shop. I have lots of ideas swimming around in my head so check back often for new designs.
Later,

I am so glad spring is finally here. Right now, I'm sitting out on my porch with my two pups, enjoying the fresh air and gentle breeze. Sometimes winter seems like it's never going to end. But it always does.
This is my favorite time of year. I have quite an extensive flower garden and I love strolling through it and seeing the plants peeking through the dirt coming out of their winter dormancy. Every spring I am so fascinated by this miracle of life and this beautiful earth God created for us.

Isn't this the sweetest little bloom on my bleeding heart?

Spring is a time for all of us to awaken from the winter blahs and rejoice in new beginnings...to revel in the glorious explosion of beautiful color after the dull, dreariness of winter. Bright green spring leaves...golden yellow forsythia...the soft pink of cherry blossoms. And so much more to come!
It's certainly a happy time of year, don't you think?

I was a child of the 70s. Peace. Love. Flower Power. It was an era like no other...the music, the fashions, and the free spirit. Bold colors, long skirts, flowing tops, flared pants, and platform shoes. I had an awesome pair of pants...hot pink and bright yellow with huge flowers...they flared from the knee to reveal hot pink when I walked...they were so cool. I wish I still had them.
This spring, it's the Age of Aquarius all over again. Bohemian and gypsy-inspired fashions and accessories are hot. From long layered necklaces, bright colors, and tribal patterns to cowboy boots, feathers, and fringe, now is the time to flaunt your gypsy soul.

Remember that bohemian style means embracing your individual personality and expressing yourself through your fashion choices. The possibilities are endless. Click to check out my *Free Spirit* collection and maybe you'll find the perfect something that suits your style. I love creating these boho looks so check back often for new designs.

Peace.

I prefer a handcrafted look for the crosses on my Christian necklaces rather than purchasing a ready-made cross. I like the rustic look and the wire "rope" holding the two pieces together (although they are also soldered to make sure they stay put). I begin by cutting a length of heavy gauge sterling silver wire and giving it an organic hammered texture. I then cut the wire into pieces for the two lengths needed for the cross. Using my micro torch, I solder the two pieces together and solder a ring at the top.

Then I drop them in my pickle solution to remove the firescale left over from the solder. Here they are in rough form after they have been pickled. Not very pretty, huh?

The next step is to straighten any that are crooked and trim them to the correct size. I then file the edges smooth and place them in a solution of liver of sulfur to give them a darker antique finish and to highlight the texture. I clean up the liver of sulfur with steel wool then tumble polish them in my Lortone tumbler for about an hour. This makes them shine but also adds strength. The final step is to add the fine silver wire that simulates a rope holding the crossed pieces together.

And, voila, they are ready to be added to my scripture necklaces.
I hope you enjoyed this little peek into a part of my jewelry making process. You can find the Christian necklaces by clicking on "Inspirational Collection" on the "Collections" tab from my home page.

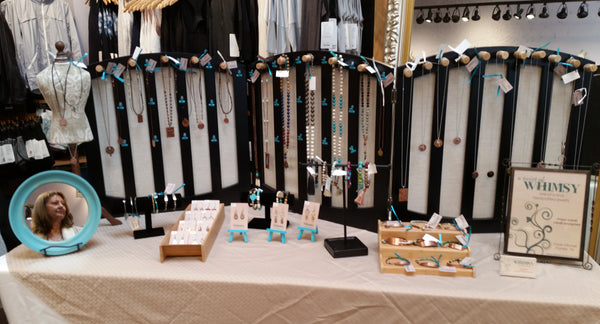
Yesterday was a fun day. I was invited to do a trunk show at our local Lululemon Athletica retail store. For those of you unfamiliar with Lululemon, they make athletic gear for yoga, running and other activities. Because my jewelry includes yoga-inspired designs, they asked me to set up in their store as an additional treat for their customers.
Here's my display for the day. Pretty good for a selfie shot, huh?